4. Making Linux System Booting Media
VAB-820 supports two booting ways. One is from Micro SD storage card and the other is SPI ROM. This section will guide you through making the Linux system boot media for VAB-820.
4.1. Making a Linux System Micro SD Storage Card
When you get u-boot.bin, uImage and root file system from LTIB, you can refer to the following sections to make it booting.
4.1.1. Requirements
- Your computer
- Micro SD storage card. Recommended size is 8GB or at least 4GB Class 4.
- SD card reader.
4.1.2. Partition Micro SD storage card
The Micro SD storage card can be identified and auto mounted once inserted to the computer. You can check Micro SD card code name by df -h, for example:
user@ubuntu:~/$ df –h
...
Filesystem       Size      Used     Avail    Use%    Mounted on
/dev/sdb1        7.2G      531M     6.3G     8%      /media/usb
However, there are some instances that the Micro SD storage card could not identify or auto mount after inserting to the computer. In that case, you can try the other way to identify the Micro SD card:
user@ubuntu:~/$ dmesg | grep -i removable
[105.502517] sd 9:0:0:0 [sdb] Attached SCSI removable disk
The Micro SD storage card code name for this example is identified as sdb. Umount Micro SD storage card before you partition it:
user@ubuntu:~/$ sudo umount /dev/sdb1
The following steps describe how to partition the Micro SD storage card:
user@ubuntu:~/$ sudo fdisk /dev/sdb
Type the following parameters (each followed by <ENTER>):
u            [switch the unit to sectors instead of cylinders]
d            [repeat this until no partition is reported by the 'p' command]
n            [create a new partition]
p            [create a primary partition]
1            [the first partition]
16384        [the starting at the offset sector for this example is #16384,
             the size is 8MB, which leaves enough space for the kernel,
             the boot loader and its configuration data. User had to
             create the starting depend on the space for kernel, boot
             loader]
<enter>      [using the default value will create a partition that spans
             to the last sector of the medium]
w            [write the partition table]
Note
Users have to create the partitions which leave enough space for the kernel, the boot loader and its configuration data made by users themselves.
Here, a new partition has been created on Micro SD storage. You have to apply the new partition table immediately, in order to format it:
user@ubuntu:~/$ sudo partprobe
The file system format for this example is ext3, you can type the command to format the partition:
user@ubuntu:~/$ sudo mkfs.ext3 /dev/sdb1
4.1.3. Copy images to Micro SD storage card
Step 1
Copy u-boot u-boot.bin to Micro SD storage card:
user@ubuntu:~/imx6/ltib/rootfs/boot$ sudo dd if=u-boot.bin of=/dev/sdb bs=512 seek=2 skip=2
The previous u-boot parameters will be stored in SPI ROM, which is identified as /dev/mtdblock0. If you want to clear the u-boot parameters to default, use the following command:
user@ubuntu:~/$ sudo dd if=/dev/zero of=/dev/mtdblock0 bs=512 seek=1536 count=16
Step 2
Copy root file system to Micro SD storage card.
You can build your own root file system from LTIB.
The root file system for this example is located at /home/user/imx6/ltib/rootfs. A folder includes driver modules, Linux instructions and configurations which depend on user’s selection in LTIB. User can make it as a compression file (e.g. tar.gz or tar.bz2) or just copy all the files from /home/user/imx6/ltib/rootfs into Micro SD storage card:
user@ubuntu:~/imx6/ltib/rootfs$ sudo tar -cjf rootfs.tar.bz2 *
Mount SD card as a folder and decompress the rootfs.tar.bz2 that you made to Micro SD storage card:
user@ubuntu:~/$ sudo mkdir /mnt/mountpoint
user@ubuntu:~/$ sudo mount /dev/sdb1 /mnt/mountpoint
user@ubuntu:~/$ cd /mnt/mountpoint
user@ubuntu:/mnt/mountpoint$ sudo tar jxvf rootfs.tar.bz2 ./
Step 3
Copy the kernel uImage to Micro SD storage card. The uImage file should be renamed as uImage.vab820 according to u-boot’s setting:
user@ubuntu:~/imx6/ltib/rootfs/boot$ sudo cp uImage /mnt/mountpoint/boot/uImage.vab820
4.1.4. Setup u-boot parameters for Micro SD card
Setup the u-boot parameter at the first time we boot from Micro SD card. Set the J11 jumper setting to make it boot from Micro SD.
| J11 : Boot Selectpins | 1-2 | 3-4 |
|---|---|---|
| SPI | Open | Short |
| Micro-SD | Short | Open |
Connect the VAB-820 and host PC through J5 (COM2) of VAB-820. Run putty or another software terminal on host PC to receive the booting message. Power on the VAB-820 and press any key to stop the booting process as shown in Figure 1.
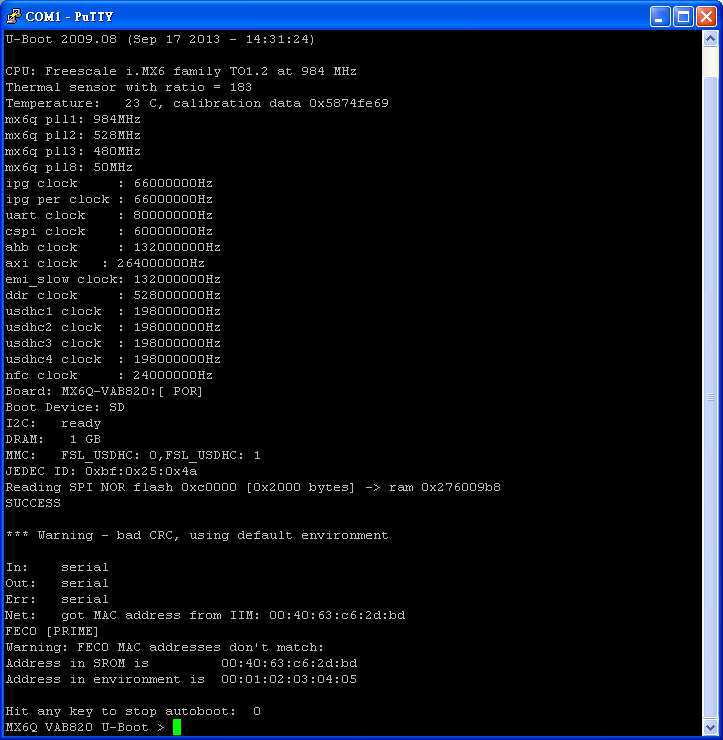
Figure 1: SD u-boot parameter
To check the parameter in u-boot:
VAB-820 U-Boot > pri
bootcmd=run bootcmd_mmc
...
The default parameter shows that it loads kernel from eMMC (bootcmd=run bootcmd_mmc). You have to set the parameters like the example below.
Then the VAB will load kernel from Micro SD card:
VAB-820 U-Boot > setenv bootcmd 'run bootcmd_sd'
VAB-820 U-Boot > saveenv
VAB-820 U-Boot > boot
4.2. Making a Linux System eMMC
VAB-820 does not support booting from eMMC by default. If you want to make a Linux system on eMMC, there is only one choice to put u-boot on SPI ROM, and put kernel and rootfs on eMMC.
4.2.1. Requirements
- A Linux System Micro SD storage card made in Making Linux System Booting Media or Appendix A. Making Ubuntu Demo Image.
- A mass storage includes: u-boot.bin, uImage and rootfs.tar.bz2.
You can put those files in a USB pen or SD storage card. To copy images to SPI ROM and eMMC, you must first boot from Micro SD card on VAB-820.
4.2.2. Burn u-boot.bin into SPI ROM
Run ls /dev to check the SPI ROM device, which is identified as /dev/mtdblock0.
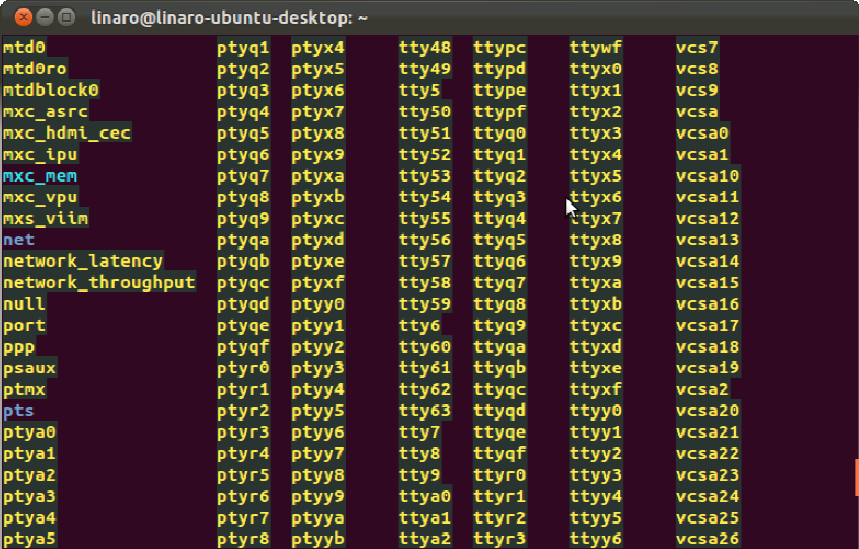
Figure 2: Example block device listing with ls /dev/
Run the following command to burn u-boot.bin into SPI ROM:
user@ubuntu:~/$ sudo dd if=u-boot.bin of=/dev/mtdblock0 bs=512 seek=2 skip=2
The previous u-boot parameters will be stored in SPI ROM. If you want to clear the u-boot parameters to default, use the following command:
user@ubuntu:~/$ sudo dd if=/dev/zero of=/dev/mtdblock0 bs=512 seek=1536 count=16
4.2.3. Partition eMMC
eMMC can be identified when booting into VAB-820 from Micro SD card:
user@ubuntu:~/$ ls -l | grep -i mmcblk
...
Sometimes the eMMC will auto mount if it is the first time of using it. Umount the eMMC before partition it. The eMMC code name for this example is identified as mmcblk0:
user@ubuntu:~/$ sudo umount /dev/mmcblk0*
The following steps on how to partition the eMMC:
user@ubuntu:~/$ sudo fdisk /dev/mmcblk0
Type the following parameters (each followed by <ENTER>):
u            [switch the unit to sectors instead of cylinders]
d            [repeat this until no partition is reported by the 'p' command]
n            [create a new partition]
p            [create a primary partition]
1            [the first partition]
16384        [the starting at the offset sector for this example is #16384,
             the size is 8MB, which leaves enough space for the kernel,
             the boot loader and its configuration data. User had to
             create the starting depend on the space for kernel, boot
             loader]
<enter>      [using the default value will create a partition that spans
             to the last sector of the medium]
w            [write the partition table]
Note
Users have to create the partitions which leave enough space for the kernel, the boot loader and its configuration data made by users themselves.
Here is an example; a new partition has been created on eMMC. You have to apply the new partition table immediately, in order to format it:
user@ubuntu:~/$ sudo partprobe
Make sure to umount the eMMC before doing the steps below.
You can type the command to format the partitions:
user@ubuntu:~/$ sudo mkfs.ext3 /dev/mmcblk0p1
4.2.4. Copy images to eMMC
User can put uImage/root file system to USB pen or Micro SD card. The storage for this example is an USB pen, and assumes the mount point is /media/usbpen.
Step 1
Copy root file system to eMMC.
The root file system for this example is generated by LTIB. The location is /home/user/imx6/ltib/rootfs. A folder includes driver modules, Linux instructions and configurations which depend on user’s selection in LTIB. User can make it as a compression file (e.g. tar.gz or tar.bz2). The compression file for this example is rootfs.tar.bz2:
user@ubuntu:~/imx6/ltib/rootfs$ sudo tar -cjf rootfs.tar.bz2 *
The compression file path for this example is /media/usbpen/:
user@ubuntu:~/$ sudo mount /dev/mmcblk0p1 /mnt/mountpoint
user@ubuntu:~/$ cd /mnt/mountpoint
user@ubuntu:/mnt/mountpoint$ sudo tar jxvf /media/usbpen/rootfs.tar.bz2 ./
...
user@ubuntu:/mnt/mountpoint$ sudo sync && sync
user@ubuntu:/mnt/mountpoint$ cd ~
Step 2
Copy kernel uImage to eMMC.
The image path for this example is /media/usbpen/:
user@ubuntu:/media/usbpen /$ sudo cp uImage /mnt/mountpoint/boot/uImage.vab820
user@ubuntu:/media/usbpen/$ sudo umount /mnt/mountpoint
Note
AMOS-820 HMI Solution Pack won’t provide Ubuntu root file system for evaluation actively. Users can get an Ubuntu demo image from Freescale official web site and follow up Freescale’s policy to evaluate. For more details, refer to Appendix A. Making Ubuntu Demo Image.
Note
For the details on how to make a compression root file system for evaluation, refer to Appendix A. Making Ubuntu Demo Image.
4.2.5. Setup u-boot parameters for SPI ROM
Setup the u-boot parameter at the first time we boot from SPI ROM. Set the J11 jumper setting to make it boot from SPI ROM.
| J11 : Boot Selectpins | 1-2 | 3-4 |
|---|---|---|
| SPI | Open | Short |
| Micro-SD | Short | Open |
Connect the VAB-820 and host PC through J5 (COM2) of VAB-820. Run putty or another terminal emulator program on host PC to receive the booting message. Power on the VAB-820 and press any key to stop the booting process as shown in Figure 3.
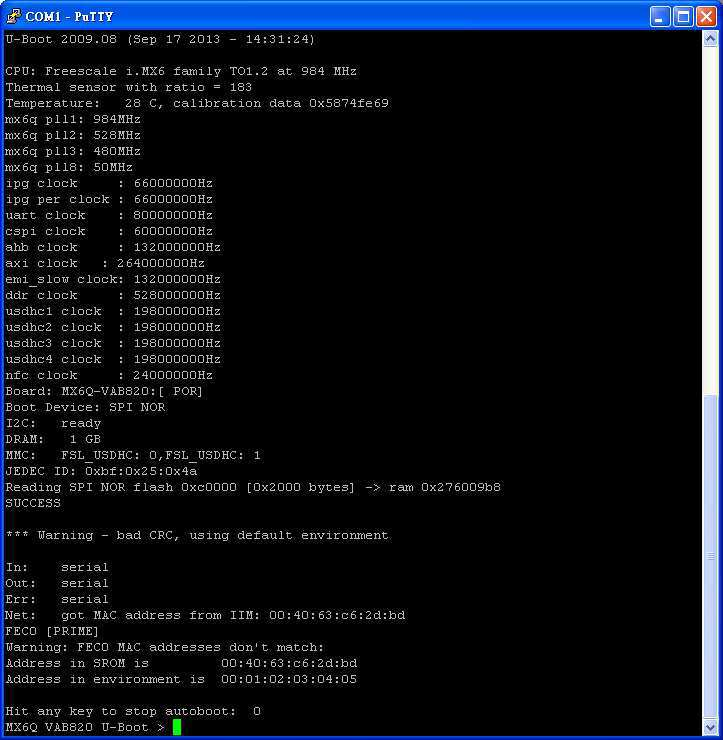
Figure 3: SPI u-boot parameter
To check the parameter in u-boot:
VAB-820 U-Boot > pri
bootcmd=run bootcmd_mmc
...
The default parameter is bootcmd=run bootcmd_mmc, which is to load kernel from eMMC. If it is not set like this, you have to set the parameters as the example shown below. Then the VAB will load kernel from eMMC:
VAB-820 U-Boot > setenv bootcmd 'run bootcmd_mmc'
VAB-820 U-Boot > saveenv
VAB-820 U-Boot > boot